
By: Kyle Sansing and Stephanie Burke
It is getting close to the time of year in which our calendar fiscal year customers will open their new fiscal year. In this blog, we will review the procedures and tips for opening a new fiscal year in OpenRDA, and setting defaults in the various modules.
One of the great things about OpenRDA is that each month and year functions independently, and multiple months/years can be open and posted to at the same time. It is not necessary to “hard close” a previous year, and you can continue to post to the prior year while a new year is open.
OPEN NEW YEAR IN FINANCIAL MANAGEMENT
Open New Fiscal Year: The first step to starting a new fiscal year is to open the financial year. This process can be found by going to Maintenance -> Financial Years/Current Month -> New Year -> Open Financial Year (see screen shot below). You will need to enter the new Fiscal Year to Open (i.e., 2016), along with a Description. Enter a range only if you want to open the fiscal year for certain funds or account codes, most customers open the year for everything at the same time so there is no need to range. next, you will click the cog (“Update Database”) button. This step will create the year under the “Financial Years/Current Month” option listed on your Financial Management home screen, and create year masters for all the account codes selected.
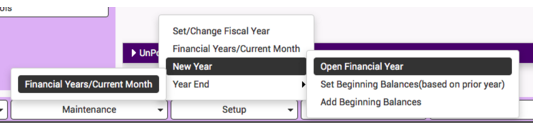
Set Beginning Balances: The next thing you should do when opening a new fiscal year is set your beginning balances. To do this, go to Maintenance -> Financial Years/Current Month -> New Year -> Set Beginning Balances Based on Prior Year (see screen shot below). This process takes the year-end balances for your fund(s) and rolls them forward to the new fiscal year. This step can be done as many times as needed, and should be completed whenever anything is posted or changed in a prior year. When rolling the beginning balances, enter the new fiscal year in the Set Beginning Balances for Fiscal Year field. In the Fund Balance (Equity) Code field, you will need to enter the balance sheet code that reflects your unreserved fund balance. For many customers, this code will have a description and/or reference type of “Fund Balance, Undesignated, Unreserved”, and can be found by running a current trial balance. This will be the account into which the difference between your revenue and expenses will be rolled for the new year. Please note that some users might not have access to this step per their security profile settings.

Change Defaults: Once you have moved into your new fiscal year, and you are done with the majority of your posting in that fiscal year, you can save time by changing your defaults. Changing your defaults will only change the fiscal year/month that automatically defaults on certain modules’ screens, and can be overridden if something needs to be entered to the previous year. The defaults do not affect your ability to post to a prior fiscal year/month.
In Financial Management, you can change your default Fiscal Year by clicking the Set/Change Default Fiscal Year option in the task list, entering the Current Fiscal Year, and clicking Save. To change the default Fiscal Month at the start of each month, click the Financial Years/Current Month option in the task list, select the current fiscal year, populate the “Default Current Processing Month” drop-down field with the current fiscal month, and save. Utilizing these options in Financial Management sets the default Fiscal Year/Month fields in the Financial Management, Payroll, Payroll Vendor Withholding and Leave modules.
VENDOR PAYMENTS
To change the Vendor Payment module’s default Fiscal Year/Month, go to Change Current Voucher Defaults, enter the new Fiscal Year/Month, and click Save.
PURCHASE ORDERS
To change the Purchase Order module’s default Fiscal Year/Month, go to Change Current PO Year/Month, enter the PO Fiscal Year and Month, and click Save.
INACTIVATE / CLOSE PREVIOUS YEAR IN FINANCIAL MANAGEMENT
The last step of the New Fiscal Year process is inactivating the previous fiscal year. Once you feel that the majority of your posting to the previous fiscal year is completed, and you have rolled your balances forward, you can perform this step. It is not required, since it’s possible to have as many years active as you like, but some customers choose to inactivate the previous fiscal year to help avoid accidental postings to that year. To inactivate the previous fiscal year, go to Financial Management -> Maintenance -> Financial Years/Current Month -> Year End-> Inactivate/Close Year, enter the year you want to inactivate, and click the cog (“Write to Database”) button. This will block new activity from being entered and posted until the year is re-activated.
In order to reactivate a fiscal year, you would need to go to Maintenance -> Financial Years/Current Month -> Year End-> Re-Activate Year. You are able to inactivate and reactivate a year as many times as needed. Note: Make sure to re-run the Set Beginning Balance process after posting to a prior fiscal year!
LEAVE MANAGEMENT
Move leave balances to the new fiscal year. Refer to the following document for guidance: http://wiki.openrda.com/wiki/index.php/LVEMGT-YEAR_END_MENU
Set liability rates on leave liability calculations. This applies only to those customers that use leave liability. Liability rates must be established using pay rates for the 2015 fiscal year (not the 2016 fiscal year), and must be done before any leave earned/used amounts for the new fiscal year are updated.
Add Leave Earned for the new year. If your employees earn leave at the beginning of the year, the Add Leave Earned process should be run after the previous year’s ending balances have been moved to the new year and have been established as the new year’s beginning balances.
PAYROLL
Make 2015 payrolls historical: In addition to cleaning up your Pay Master Browse, this will remove the old payrolls as selections in the drop-down Pay Identification field in all the payroll processes (Compute Payroll, Make Transactions, etc.), enabling you to run through the payroll steps in an efficient manner. You will still be able to access historical payrolls, by simply removing the Historical flag. There is a process that allows you to flag multiple payrolls as historical in mass. To run this process, go to Maintenance ? Set, Change or Clear ? Set Historical in Pay Master. To include all Pay ID’s, run it without ranging.
Update salaries for the new fiscal year: To do so in mass, go to Maintenance ? Set, Change or Clear ? Change Misc Job Rate Amounts. Note: If using matrices (salary scales), different steps apply. If using Budget Prep, go to Budget Preparation ? Update Tab ? Payroll ? Jobs and Budget Preparation ? Update Tab ? Position Tracking ? Gross Rates. Note: If using matrices, additional steps are needed.
Update Retirement and/or Life Insurance Salaries: If you maintain either/both amounts in employees’ Job Masters, and you are entering salary changes for the new year, remember to also update the Retirement Salary/Life Insurance Salary fields as applicable. In-mass processes are found under Maintenance -> Set, Change or Clear ? Life Insurance and Retirement Salary.
Update deductions for the new year: To efficiently change employee Deduction Master amounts (for example, for a health insurance deduction) for all employees, go to Setup ? Deductions ? Deduction Descriptions -> (select the deduction) -> click Personnel Deductions. This will provide a list of employees from which you can work.
Much of the information listed above is suggestions and not hard rules. Please keep in mind that your organization’s policies may require you to follow different and/or additional procedures. If you have any questions about opening a fiscal year, please do not hesitate to contact the Support Team. You can submit a help desk ticket, call us at 800-338-4984, or send an email to support@rdasys.com.